 Add
Add  results in
For further reference, also see Quartic's Explanation and Kai's Power Tips.
What does this mean? Well, say for example you have a completely white image. All the values, therefore, are 255. When you Add this to another image, it will turn the entire image completely white as well, because 255 + n >= 255. (Negative values not accepted of course :).
If you have a completely black canvas, all the values are zero. When you Add this to another image, it has no effect, since 0 + n = n, no matter what.
How is this useful? If you Add an image with a black and white pattern on it, the white areas effectively blank out the other image, while the black areas leave the other image untouched. A picture is worth a thousand words, so take a look at this:
Add results in
Also, you don't have to use just black and white images...here's an Add using a vertical fade for one of the images:
 Add
Add  results in
Note that you can also do this with full color images. If you do, it takes values from each channel individually when doing the calculations.
This means that if a white image is subtracted from any image, it results in a black image. A black image subtracted from an image has no effect. White areas in a subtracting image produce complete black, and black areas in a subtracting image have no effect whatsoever.
The key thought here is, you're doing math with pixels. It's not some magic filter that does some whiz-bang transformation based on the sine of the hypotenuse of something (if it was, I'd never understand it, I was terrible at trigonometry). You're doing some very simple mathematics.
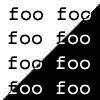
A picture is worth a thousand words:
Subtract results in 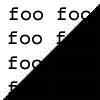
And it follows that:
Subtract results in 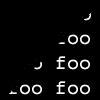
That means, values that are similar in each image get very dark (or black), and values that are different in each image get very bright (or white, as the case may be). Areas of maximum and minimum difference result in white and black pixels, respectively. (Please note that when I say black and white, it's relative to the channel you're working on...white in the red channel becomes bright red, etc.)
Difference results in
This also leads to an interesting discovery:
Difference results in 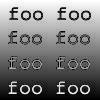
Notice the jaggy lines in the resulting image? This is a side effect of anti-aliased text. Since the jaggy edges have been smoothed with gray edges, to make the text look better, those grey pixels become black as a result of the channel operation. It really makes them stand out like a sore thumb. This artifact comes in handy for certain visual effects, particularly the Cows on LSD one.
Lighter results in 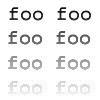
Darker results in 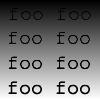
If a pixel is dark in the mask, it outputs the values from the first image. If the pixel is bright in the mask, it outputs values from the second image. The upshot of all this is, black pixels get filled in with the first image, and white pixels get filled in with the second image. If a pixel is grey in the mask, it basically blends the two images together.
This is really incredibly handy, and most of my fun tips do something with Composite. Here are some of the applications of Composite, using my stock images:
Mask Image 1 Image 2 results in 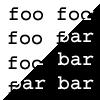
And here's another good example:
Mask Image 1 Image 2 results in 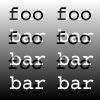
Important: The mask's pixels never become part of the resulting image; they just define how much gets taken from which image.
Blend results in 
(Are you getting sick of me using the same images each time? Well, try using some of your own! Experiment!)
From: Federico Mena Quintero
Reply to: quartic@polloux.fciencias.unam.mx


Multiply - Multiplies the pixels of one image by the pixels of the
other one.  If the pixels were in the real range [0, 1], it could be
viewed as

        for (every pixel)
                dest_pixel = source1_pixel * source2_pixel;

And this would also produce values in the range [0, 1].  However, our
integer values are in [0, 255], so the actual formula used is

        dest_pixel = source1_pixel * source2_pixel / 255;

This is to 'bring back' the values to [0, 255].  Note that multiplying
an image by another one always darkens the result.  This is because a
number in the range [0, 1] multiplied by another number in the same
range will always be smaller than or equal to either of them.
Basically, this treats both images as being of "unit brightness" (I think
that's the right term), in
other words, with a maximum brightness of one and a minimum brightness of
zero. It then multiplies the unit brightness of each image together. Since
multiplying anything less than 1 by something else always results in a
smaller value, the image always gets darker.
Multiply results in